Well day 6 is here and I thought I would share with you two things I made over the weekend. These boxes were intended to hold Christmas gifts as an alternative to wrapping paper, but I am so pleased with them I may have to keep them!
The purple box is 4 inches square and the 'steampunk' box is 3 inches square.
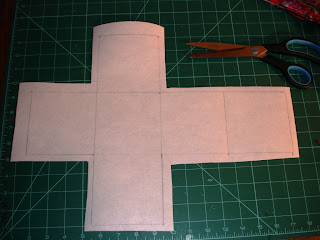
Here is how to make a fabric box (the purple one):The pattern is a very simple 6 square configuration making sure all the squares are the same size so they fit together as a cube. Each square needs to be 4 inches square to make a 4 inch square box. I drew mine onto pelmet vilene and left about 1/2 inch all the way round so I could ensure that my materials went over the edges. You can leave a little flap on the square on the right of this picture (which will become the lid) to secure the box lid if you wish.
Then gather together your materials. You can use anything you have handy, including paper, silk, cotton, velvet, wool and anything else you have lying around. This is a great way of using up all those little scraps we end up with! Use a sewing machine stitch everything down any way you like. I kept some areas 'straight' so that when I put the box together I would have some horizontal areas, but just go with your gut! Then stitch over the top of the whole piece with contrasting threads in a pattern. I used circles, but you could use wavy lines, or flowers or anything that takes your fancy. The idea is to draw the whole thing together.
Then trim the box back to size and iron a lining material onto the back using bondaweb. I used some purple silk dupion to tie in with the outside but you can use anything you have to match or contrast the outside design.
Zigzag stitch around the whole thing to secure the backing and strengthen the edges.Then use a slip or ladder stitch to hold the edges of the box together. I ironed the folds before I sewed it together to get a good fold, but you will need to be careful here if you have used fabrics or embellishments that don't like the iron. If this is the case, work the folds with your fingers, or you could run a line of running stitch along the crease to make it fold more easily.
Secure your box anyway you choose. I used a piece of wool that I had zigzag stitched over to make a crod, and then sewed a button onto the front of the box to loop it around.
Well there we are - I think that is probably enough for today. I will share the instructions for the smaller box tomorrow.


Now that is a fantastic box! I have 2 carriers full of scraps and this is a great way to use them up! Many thanks for sharing the idea and the instructions :-) I shall have to go shopping for vilene!
ReplyDeleteOh you are sooooooooo clever ,thanks for sharing this one its super ..one to copy ...love Jan xx
ReplyDeleteOh wow! Spectacular! I'd want to keep them too.
ReplyDeleteFabulous, fabulous box. And thanks for your generous sharing of the instructions. I have so many scraps... definitely have to bookmark this page!
ReplyDeleteWell I am impressed with the advent blog - well done Gina for thinking of it - I had not ready any blogs for a few days so managed to miss that.
ReplyDeleteGlad you enjoyed Harrogate and the creativity is looking good.