So what is a rag quilt? well put simply, it has exposed seams on the front of the quilt that are snipped so they go 'raggy'. Washing makes the rags even more pronounced.
This is a great pattern for a beginner, because the ragged edges hide a multiple of sins (when your squares don't quite match up!). A fun quick make.
Requirements:
- Fabrics for the front - flannel, homespun and denim is a great choice for this pattern, though quilt weight cotton is also fine. I have used some gorgeous fabric by Craft Cotton Company called Dobby - there are 5 fat quarters in the bundle and I didn't use the hole bundle
- Fabric for the back
- Wadding
- Thread - I chose Gutterman 40 ct thread because I want it to show!

Step 1 - cut your fabrics squares. You can make them any size you like - the wadding must simply be 1 inch smaller than the fabric squares. For mine, I cut 5 1/2 inch squares of the top fabrics and the backing fabric (using white scraps for these), and the wadding 4 1/2 inch squares. I cut 36 sets of squares making a rug measuring 27 inches x 27 inches. You can just keep adding squares to make it bigger!
 |
| Supplies |
 |
| Dobby range by Craft Cotton Company |
Step 2 - place your front piece face down on your table and centre the wadding on top and then add the backing piece on top.
 |
| Layer with wadding |
 |
| Make a full quilt sandwich with the front, wadding and backing, and pin |
Step 3 - Quilt (optional). I marked my diagonal lines with quilters tape to keep my lines nice and straight, but you could do wavy lines, or simply not quilt at all - the choice is yours! Use your walking foot to keep all the layers together.
 |
| Quilt |
 |
| Quilted square |
Step 4 - put your squares wrong sides together (the opposite to the usual right sides together) and stitch with a 1/2 inch seam allowance. This should run along the edge of the wadding, but don't worry if you catch the edge of it. The walking foot will help everything stay together without moving.
 |
| squares stitched together with the seams on the outside |
Step 5 - stitch squares together and then sew the rows until you reach the required size. Stitch around the finished lap quilt with a 1/2 seam allowance.
Step 6 - now start cutting! Snip through all the visible seams and around the edge of the quilt, ensuring that you don't cut through the stitching.
 | ||||||
| Snipped seams |
Step 7 - this quilt gets better with washing because it makes the seams fluff up even more! Popping it in the tumble dryer works even better to get a really fluffy quilt.
 | ||
| Washed rag quilt |
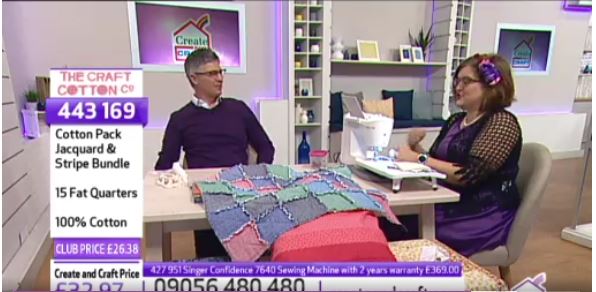 |
| Demoing the quilt on my Create and Craft show on 29th January 2018 with Dean Wilson |
Now simply enjoy your new rag quilt!


No comments
Feel free to let me know what you think!